I have to admit it, [Neo]vim is my editor for everything. I started using Vim in college, and we have been together since those, but, since a time ago, now as its fork Neovim.
Do I have to edit a file? Neovim.
Do I have to do a bash script? Neovim.
Do I have to do a little python script? Neovim.
Vim and Neovim are very lightweight and very powerful. Vim comes installed in (almost) every linux distro, and they are very convenient to use via ssh.
Although for medium or large python projects my favorite IDE is Pycharm (I really love Pycharm), for small and fast (or no so fast scripts) I preffer neovim or vim, depends on which one is installed.
The point is that, while I was coding some python scripts, above all using new libraries, I missed some features provided by a IDE. Features I was used to in Pycharm, as autocomplete and linting (analzing source code to flag programming errors, bugs, stylistic errors, etc.). So, I decided it was time to configure Neovim to improve my python experience.
[Neo]vim base configuration
This is my base configuration. My configuration for all, in all my computers, no matter the purpose. This configuration will be the base to which I will add the python configuration.
~/.config/nvim/init.vim:
1
2
3
4
5
6
7
8
9
10
11
12
13
14
15
16
syntax on                       "syntax highlighting
filetype plugin indent on       "file type detection
set number                      "display line number
set path+=**                    "improves searching
set noswapfile                  "disable use of swap files
set wildmenu                    "completion menu
set backspace=indent,eol,start  "ensure proper backspace functionality
set incsearch                   "see results while search is being typed, see :help incsearch
set smartindent                 "auto indent on new lines, see :help smartindent
set expandtab                   "expanding tab to spaces
set tabstop=4                   "setting tab to 4 columns
set shiftwidth=4                "setting tab to 4 columns
set softtabstop=4               "setting tab to 4 columns
set showmatch                   "display matching bracket or parenthesis
set hlsearch incsearch          "highlight all pervious search pattern with incsearch
"set list                        "show all whitespaces (uncomment without Better Whitespace plugin)
In my base configuration I usually add the Vim Better Whitespace Plugin (I’ll talk about it later), but I keep the option “list” handy (but commented). The “list” option, by default, show tabs as “>”, trailing spaces as “-“ and non-breakable space characters as “+”. This default configuration works for me, but can be customized.
pylsp
In order to use nvim-cmp and nvim-lspconfig, we need to install a Language Server Protocol (LSP), in this case pylsp. The Language Server Protocol (LSP) is a protocol used between a development tool and a Language Server (LS) that provides language features like autocompletion, go-to-definition, etc.
1
pipx install 'python-lsp-server[all]'
For Neovim to load pylsp when we are working on a python file we need to create a directory, a couple files and add a little configuration to our init.vim file.
The directory:
1
mkdir /home/rubenhortas/.config/nvim/lua
The first file (lua_config.lua):
1
echo "`call plug#begin('/home/rubenhortas/.config/nvim/plugins')`" > /home/rubenhortas/.config/nvim/lua/lua_config.lua
Now, we need to create the file /home/rubenhortas/.config/nvim/lua/lsp_config.lua, and add the following lines:
1
2
3
4
5
6
7
8
9
10
local lsp = require('lspconfig')
local completion = require('completion')

local custom_attach = function()
    completion.on_attach()
    -- Python specifically isn't setting omnifunc correctly, ftplugin conflict
    vim.api.nvim_buf_set_option(0, 'omnifunc', 'v:lua.vim.lsp.omnifunc')
end

lsp.pylsp.setup{on_attach=custom_attach}
Now, we edit our init.vim file to append the following lines:
1
2
" neovim LSP Configuration
lua require('lua_config')
[Neo]vim plugin manager
As plugin manager, my choice is vim-plug, and its installation it’s very straightforward:
Unix/linux:
1
sh -c 'curl -fLo "${XDG_DATA_HOME:-$HOME/.local/share}"/nvim/site/autoload/plug.vim --create-dirs https://raw.githubusercontent.com/junegunn/vim-plug/master/plug.vim'
Plugins
I install three plugins:
nvim-cmp A completion engine plugin.
nvim-lspconfig Configs for the Nvim LSP client.
Vim Better Whitespace This plugin highlights all trailing whitespaces. It’s totally optional and can be substituted by the option “lines” in the
vim.initfile, but I like it.
We need to create the directory where we will install the plugins. I install my plugins in /home/rubenhortas/.config/nvim/plugins, so:
1
mkdir `/home/rubenhortas/.config/nvim/plugins`
nvim-cmp
A completion engine plugin for neovim written in Lua. Completion sources are installed from external repositories and “sourced”. To install it we need to add the following to our init.vim file:
1
2
3
4
5
6
7
8
9
10
11
12
13
14
15
16
17
18
19
20
21
22
23
24
25
26
27
28
29
30
31
32
33
34
35
36
37
38
39
40
41
42
43
44
45
46
47
48
49
50
51
52
53
54
55
56
57
58
59
60
61
62
63
64
65
66
67
68
69
70
71
72
73
74
75
76
77
78
79
80
81
82
83
call plug#begin('/home/rubenhortas/.config/nvim/plugins')
Plug 'hrsh7th/cmp-nvim-lsp'
Plug 'hrsh7th/cmp-buffer'
Plug 'hrsh7th/cmp-path'
Plug 'hrsh7th/cmp-cmdline'
Plug 'hrsh7th/nvim-cmp'

" For vsnip users.
Plug 'hrsh7th/cmp-vsnip'
Plug 'hrsh7th/vim-vsnip'

call plug#end()

lua <<EOF
  -- Set up nvim-cmp.
  local cmp = require'cmp'

  cmp.setup({
    snippet = {
      -- REQUIRED - you must specify a snippet engine
      expand = function(args)
        vim.fn["vsnip#anonymous"](args.body) -- For `vsnip` users.
        -- require('luasnip').lsp_expand(args.body) -- For `luasnip` users.
        -- require('snippy').expand_snippet(args.body) -- For `snippy` users.
        -- vim.fn["UltiSnips#Anon"](args.body) -- For `ultisnips` users.
      end,
    },
    window = {
      -- completion = cmp.config.window.bordered(),
      -- documentation = cmp.config.window.bordered(),
    },
    mapping = cmp.mapping.preset.insert({
      ['<C-b>'] = cmp.mapping.scroll_docs(-4),
      ['<C-f>'] = cmp.mapping.scroll_docs(4),
      ['<C-Space>'] = cmp.mapping.complete(),
      ['<C-e>'] = cmp.mapping.abort(),
      ['<CR>'] = cmp.mapping.confirm({ select = true }), -- Accept currently selected item. Set `select` to `false` to only confirm explicitly selected items.
    }),
    sources = cmp.config.sources({
      { name = 'nvim_lsp' },
      { name = 'vsnip' }, -- For vsnip users.
      -- { name = 'luasnip' }, -- For luasnip users.
      -- { name = 'ultisnips' }, -- For ultisnips users.
      -- { name = 'snippy' }, -- For snippy users.
    }, {
      { name = 'buffer' },
    })
  })

  -- Set configuration for specific filetype.
  cmp.setup.filetype('gitcommit', {
    sources = cmp.config.sources({
      { name = 'git' }, -- You can specify the `git` source if [you were installed it](https://github.com/petertriho/cmp-git).
    }, {
      { name = 'buffer' },
    })
  })

  -- Use buffer source for `/` and `?` (if you enabled `native_menu`, this won't work anymore).
  cmp.setup.cmdline({ '/', '?' }, {
    mapping = cmp.mapping.preset.cmdline(),
    sources = {
      { name = 'buffer' }
    }
  })

  -- Use cmdline & path source for ':' (if you enabled `native_menu`, this won't work anymore).
  cmp.setup.cmdline(':', {
    mapping = cmp.mapping.preset.cmdline(),
    sources = cmp.config.sources({
      { name = 'path' }
    }, {
      { name = 'cmdline' }
    })
  })

  -- Set up lspconfig.
  local capabilities = require('cmp_nvim_lsp').default_capabilities()
  -- Replace <YOUR_LSP_SERVER> with each lsp server you've enabled.
  require('lspconfig')['pylsp'].setup {
    capabilities = capabilities
  }
EOF
Replace the plugins directory in the first line with your own.
Also, replace the ‘YOUR_LSP_SERVER’ value with ‘pylsp’, our Language Server Protocol (LSP).
nvim-lspconfig
To install it, we add the plugin to our init.vim file, into the call plug#begin('/home/rubenhortas/.config/nvim/plugins') section, below all the lines:
1
2
3
4
5
6
call plug#begin('/home/rubenhortas/.config/nvim/plugins')
...

Plug 'neovim/nvim-lspconfig'

call plug#end()
Vim Better Whitespace
This plugin causes all trailing whitespace characters to be highlighted. Whitespace for the current line will not be highlighted while in insert mode. It is possible to disable current line highlighting while in other modes as well. A helper function :StripWhitespace is also provided to make whitespace cleaning painless.
This plugin is optional, and can be substituded by the “lines” option in the vim.init file. But, I like it, and the :StripWhitespace function is very useful.
To install it we add the plugin to our init.vim file, into the call plug#begin('/home/rubenhortas/.config/nvim/plugins') section, below all the lines:
1
2
3
4
5
6
call plug#begin('/home/rubenhortas/.config/nvim/plugins')
...

Plug 'ntpeters/vim-better-whitespace'

call plug#end()
Installing the plugins
To install the plugins we open nvim and run:
:PlugInstall
Ignoring errors
I find quite annoying the “E501 line too long error”. I think that 80 (or 100) characters are a little short sometimes for the screens we have today. If you, as me, want to ignore this error (and/or others), you can create the file ~/.config/pycodestyle and specify what errors you want to ignore:
1
2
[pycodestyle]
ignore = E501
And, that’s all. Now you can start to using Neovim as your Python IDE!
Screenshots
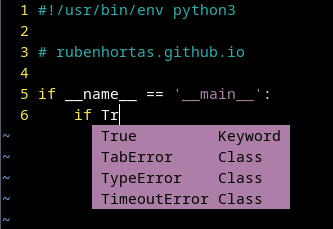 Example of autocompletion
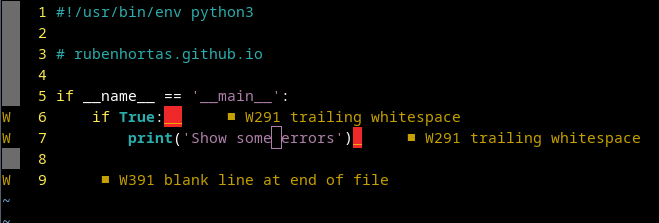 Example of linting errors and trailing whitespaces
Enjoy! ;)